So the Holiday season has passed, but it’s not too late for a Yule Log (aka a Bûche de Noël)!! I’ve been meaning to put some content in my blog for a while so I thought it might be a great idea to put a recipe. I first heard about a Bûche de Noël from a cooking manga I used to read as a kid (yeah pretty lame, but at least manga got me started on baking. Kitchen Princess, anyone?). Now, I’ve made a few roll cakes/roulades before, but never anything this crazy. Typically I follow the Asian take on Swiss rolls, as they tend to be lighter and less sweet. As a general rule, I half the amount of sugar in any American recipe because they’re always super overloaded! Anyways, I frankensteined this recipe from a few different sources, since I couldn’t find the perfect one to use. Keep in mind this is my first time making a Yule Log, so I’m open to improving it down the line. The reason it’s titled as ill-equipped is because I don’t have a lot of baking tools…. check my notes later to see what I mean. I wanted to write my own take on the classic Yule Log recipe and figured it’d be a great first blog post. It may seem intimidating, but it’s not that difficult. Here it is!

Bûche de Noël
Ingredients
- 4 eggs
- 50g cake flour
- 30g cocoa
- 30g melted butter
- 80g sugar
- 1/4 tsp salt
- 100g milk chocolate
- 100g dark chocolate
- 1 cup heavy cream (240ml)
- 1/4 tsp salt
Filling
- 150 ml Heavy Cream
- 1 tbsp Sugar (or to taste)
- 1 tsp vanilla
- Optional: powdered coffee.
Meringue Mushroom
- 2 large egg whites (~60 g)
- 1/4 cup granulated sugar
Some notes:
- Everything should be at room temperature! A quick way to make eggs warm is submerging them in warm water.
- Another quick way to make melted butter is by making a mini-double broiler by using one small bowl and one sauce dish. I filled the small bowl with boiling water and the sauce dish with butter in small cubes. They melt super fast (and then you don’t have to clean up your pot).
- I actually don’t have a square baking pan, so I DIY-ed my own by origami-ing the parchment paper to create a new barrier in my 9″x13″ rectangular pan, and supporting it using aluminium foil. So technically I used a 9″x9″ pan.
- Whipping the Ganache is optional. I wanted it to be lighter since I found it to be a bit heavy. I found that the whipped Ganache also gave better textures.
- For the filling, I opted for a simple whipped cream filling since it’s not as guilt-inducing as the traditional buttercream. Feel free to replace with buttercream though. Keep in mind that the cake won’t last as long with whipped cream since it will start getting soggy after a day.
- I also don’t have a piping bag or tips, hence why the mushrooms look so funky. I think they still look pretty decent!!
- If you don’t have a cookie cutter, you can use a knife instead when forming the little stump. I used a little tea infuser as a guideline to cut a round circle.
The following steps are in order. Everything should work out time-wise if done properly.
Cake
- Preheat oven to 350F (175C). Lightly grease an 11″ (28cm) square baking pan with butter, then line with parchment paper.
- Divide eggs into whites and yolks. Put the yolks in your electric mixer bowl. Save the whites for later.
- Sift cake flour and cocoa together in a small bowl. Set aside.
- Beat yolks and 1/3 of sugar until it’s thick and light. It should be creamy.
- In a different bowl, beat your egg whites. Slowly add the rest of the sugar in 3 parts as you are beating the eggs. Whip until stiff peaks. This is your meringue base.
- In the bowl of beaten yolks, add 1/3 of the meringue, and fold in carefully using a spatula without deflating the foam. Add this mixture back to the rest of the meringue, and carefully fold in the same way.
- Sift the cocoa-flour mixture and salt into the egg mixture, and carefully fold. Finally add melted butter and fold again.
- Pour the batter into the prepared baking pan and spread it evenly with a spatula. Drop it on the counter a few times to release air bubbles and bake for 10-12 minutes.
- Take out from the oven when the batter is no longer sticky, but the cake is still kinda moist. It’ll continue to cook when you take it out. Do not over bake it or rolling will be difficult!
- Lay out a new parchment paper dusted with cocoa powder. While your cake is still warm, take it out of your pan and peel the old parchment paper. Lay it down on the new dusted parchment paper.
- Making sure to not make any cracks, roll the cake with the parchment paper while it’s warm. This makes it easier to roll later and helps prevent cracking. Set aside to cool.
Ganache
- Put 1 cup of your heavy cream into the microwave and stir every so often until it starts to bubble. It took 3 minutes in my microwave on high, and I stirred every 1 minute.
- While waiting on your heavy cream, chop up both your milk and dark chocolates until they are very fine. (Seriously, the finer the better). Place them in a bowl
- Pour the hot heavy cream into your chocolate and let it sit for 10 minutes. Make the filling while you’re waiting on it.
- After ten minutes, pop it in the fridge while you make the meringue mushrooms. This just helps it thicken faster.
- When your mushrooms are in the oven, add salt and whip up your ganache using an electric mixer for a few seconds. It shouldn’t be beaten until it becomes whipped cream, but it should be creamy enough to hold some shape.
Filling
- Combine sugar and cream and vanilla in a bowl and beat with an electric mixer until stiff.
- Add some of the whipped ganache to the filling.
- Set aside two scoops of filling and add additional ganache to it for a darker color. This will serve as the color of the cross-sections.
You should have three different colors of cream. Light for the filling, Medium for the cross-sections and a Dark ganache for the bark. Store both the filling and ganache in the fridge while you make the mushrooms.
Meringue Mushroom
- Set your oven to 200F. Line a pan with parchment paper.
- Beat egg whites in electric mixer. When it starts to foam add the sugar and mix until medium peaks. (The eggs should be able to ribbon, but hold up some shape).
- Put the egg whites in a ziplock bag. Snip off the tip. Don’t make it too small that the meringue can hardly come out, but don’t make it too big that you can’t control it. Should be slightly bigger than how toothpaste comes out.
- On the parchment paper, pipe out several half-domes which will be your mushroom head. You might want to practice first. You can use your fingers to help smooth the surface.
- For the mushroom stalks, pipe out a smaller circle and pipe the meringue upwards to form small unicorn horns. Make more stalks than heads as the stalks can be more brittle when you’re assembling.
- Bake in oven for 1 hour and take it out when the edges are a bit brown. While waiting we will finish the ganache and start the assembly.

Before baking. Could be worse right?
Assembly
- Unroll your cake carefully, and spread the light-colored filling on top using a spatula. (Optional: You can cut at a 45 degree angle on the side of the cake that will be outside to help it fold. You can also make small scores in the cake about 1″ apart from each other to help it roll better. I suck at it and end up cutting all the way through so I usually skip this step.)
- Carefully, avoiding cracks, roll up your cake again. Make sure to have some filling on the end to help the roll stick. Lay it on the folded end.

A bit overstuffed but hey, no cracks!! - Put the cake in the fridge for 30 minutes. Meanwhile you can start cleaning up!
- After the cake is set, use a circular cookie cutter to cut out one side of the roll, fill it up with filling, and then put the cut-out cake on top. This forms a little stump on your log.
- Using a decorating spatula, spread the medium-colored fillings on the cross sections: the stump, and the two ends.
- Spread the whipped ganache on the cake’s “bark”. Add texture using a fork, making curvy lines on the bark and circles on the cross-sections.

- Dust your log with some powdered sugar for snow.
- By now your mushroom meringue should be done in the oven. Peel them off of the parchment paper.
- Using either ganache or nutella, cover the bottom side of the heads with a knife. Using the tip of your knife, make a little hole on the bottom of the head and fill it with some ganache or nutella. Stick a stalk on the head.

- Dust some cocoa powder on top of your mushrooms to look like dirt. There are some variations to this, such as covering the heads with chocolate, smudging cocoa powder with your fingers; get creative!
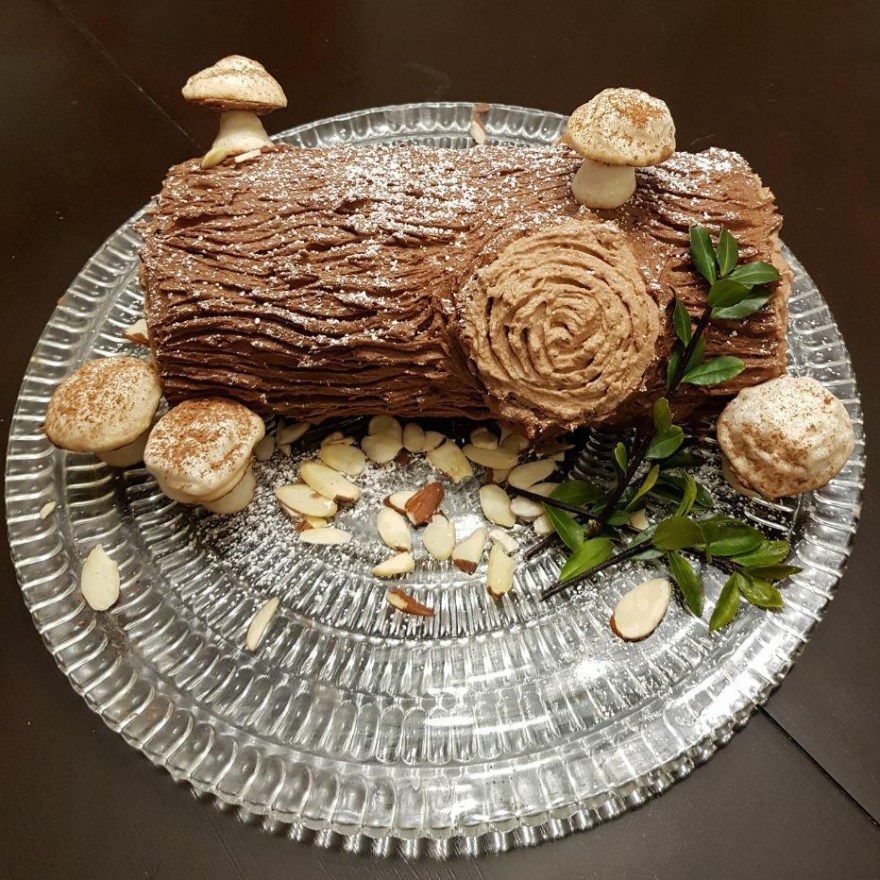
- Place the mushrooms on your log and around it. Garnish with some chopped almonds, and maybe some leafy branches and pine cones stolen from your backyard!!
Enjoy! 🙂

Definitely one of the prettier Bûche de Noëls I’ve seen.. can’t wait to try it!
LikeLiked by 1 person
So impressive!!!
LikeLiked by 1 person
Thanks Logan!!!
LikeLike
I love this so much! Such a pretty little log, very realistic too!
LikeLike
Thank you so much! I love your blog 🙂
LikeLiked by 1 person