Vegan Spiced Pumpkin Pie with Speculoos Crust

20191101_125718

This recipe is adapted from Hummingbird High. I didn’t use to be a pumpkin person, but that all changed after I found Hummingbird High’s blog! I love all her recipes and especially enjoy the Asian twists she puts in desserts like her overnight ube cinnamon rolls. I find that a lot of recipes are too vague and often result in desserts that are too sweet (especially true for western desserts), but her recipes have yet to fail me. Her pumpkin pie recipe was the first pumpkin pie I’ve ever made so it holds a special place in my heart. As I slowly began to phase out dairy, I became really interested in vegan baking (which is not only cruelty-free but also dairy-farts-free!) Naturally I thought it’d be a great chance to veganize this awesome pumpkin pie recipe!

One of the best things about this recipe is that it uses a cookie crust, instead of a typical dough crust. I think it’s a great contrast to the custardy filling and it’s honestly so much easier to make than dough crusts. There’s not much I changed from her recipe, except that I added more spices to it. If you like pumpkin pies that are on the spicier side, you’ll love this recipe. Otherwise, I recommend halving the spices.

If you’ve seen Hummingbird High’s pie, then you’ve probably seen the gorgeous marbling she did with Crème Fraiche. I tried to replicate it with vegan cream cheese, but it didn’t work out so well. It’s purely decorative though, so I left it out of this recipe version. I think at my next attempt, I’ll dilute the cream cheese a bit with some almond milk so it’s less clumpy! I’ll update this recipe if I do. If you try it out, let me know what happens 😊 I decorated the pie with coconut whipped cream to make up for the less than appealing marbling (hah!).

This recipe makes a 9-inch pie. You should use a pie tin with a removable base. I bought the Speculoos cookies from Trader Joe’s (they’re SO good… and vegan!). It was about 1 1/3 boxes of TJ’s speculoos cookies for the crust. I found the coconut condensed milk at Mom’s Organic Market but it’s pretty simple to make at home if your grocery store doesn’t have it! I also made the pumpkin puree from scratch (baked a pumpkin, blended it, strained it) but you can replace it with canned puree.
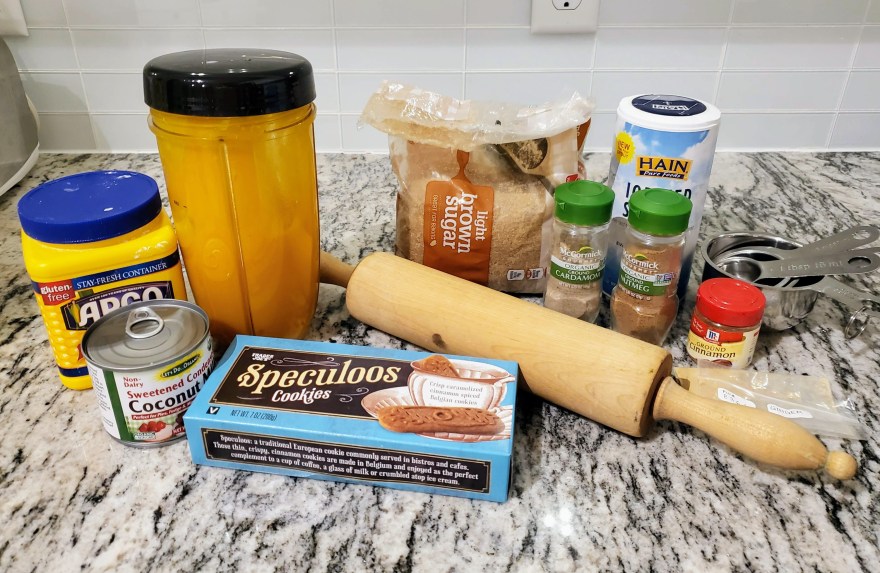
20191031_192925 (1)

Ingredients:

Speculoos Cookie Crust:

  • 10 ounces speculoos cookies
  • 1 tablespoon dark brown sugar, tightly packed
  • 1 teaspoon kosher salt
  • ½ cup vegan butter, melted and cooled

Pumpkin Custard Filling:

  • 2 cups pumpkin puree (or 1 can ~15 oz of pumpkin puree)
  • ½ cup light brown sugar, tightly packed
  • 2 teaspoons ground cardamom
  • 2 teaspoons ground nutmeg
  • 1 teaspoon ground ginger
  • 1 teaspoon ground cinnamon
  • 1/2 teaspoon salt
  • 1 teaspoon vanilla extract­
  • 1 ¾ cup (14 ounces) coconut condensed milk
  • 1/4 cup cornstarch
  • 1/4 cup almond milk (or other plant-based alternatives)

Steps:

Speculoos Crust:

  1. Center rack in the oven and preheat to 350F
  2. Using a food processor, ground speculoos cookies, dark brown sugar, and salt until course and combined. (Alternatively, use a rolling pin and a zip loc bag to ground the cookies until course)
  3. Stream in melted butter in the processor and pulse until evenly combined and crumbs are slightly clumpy.
  4. Transfer the crumbs to your 9-inch pie pan and press them tightly and evenly to the bottom and sides of the pan using your fingers. The crust should be ¼ inch thick
  5. Bake in the preheated oven for 8 minutes and transfer to wire rack to cool. Leave the oven on while you prepare the filling.

20191031_200602 (1)

Pumpkin Custard Filling:

  1. In a large pot over medium heat, combine pumpkin puree, light brown sugar, and all spices. Cook for 5 minutes using a heatproof rubber spatula to scrape puree from the pot frequently to make sure it doesn’t burn. It will sputter around 2-3 minutes in and become glossy around 5 minutes.
  2. Meanwhile, combine your cornstarch with almond milk to make a thick paste.
  3. Remove the pot from heat, stream in the coconut condensed milk while stirring the mixture. Once combined, stream in your cornstarch paste in the mixture.
  4. Pour the mixture into your pre-baked speculoos crust.
  5. Bake for 35-40 minutes in the oven or until edges have set. If you tap the sides of the pie, you should see that the center still wobbles but that the edges are still. Don’t overcook because the filling will continue to cook as it cools out of the oven.
  6. Transfer to a wire rack and cool completely. Serve and decorate with coconut whipped cream.

20191101_130747 (1)

A Very Mushroom-y Risotto

Putting up this recipe for future reference!

Adapted from https://www.allrecipes.com/recipe/85389/gourmet-mushroom-risotto/, this recipe is so much mushroomy goodness.

Servings: 2 large servings, or 3 smol servings

  • 4 cups of water, lukewarm
  • 1 cup of dried mushrooms (I used Morels and Shiitake)
  • Flour
  • 1 large portabello mushroom cap, sliced thinly
  • 1 tablespoon of olive oil
  • 3 cloves of garlic, diced
  • 1 cup of Arborio rice (can replace with sushi rice)
  • 1/6 cup of rice vinegar
  • 1/6 cup of mirin, lemon mix
  • 3 tablespoons of dashi
  • 3 tablespoons of butter
  • dash of thyme
  • dash of oregano
  • fresh basil
  • fresh green onions
  1. Soak all dried mushrooms in lukewarm water for 30 minutes. Make sure they’re not just floating around.
  2. Strain the broth and mushrooms through a coffee filter/paper towel to get rid of all the dirt. Rinse off mushrooms and dry.
  3. If your mushrooms are too big (Shiitake), slice them into small slices.
  4. In a shallow plate with a layer of flour, coat mushrooms evenly with flour.
  5. Heat 1.5 tablespoons of butter in skillet. Add mushrooms and cook until crispy. Remove from pan and set aside.
  6. Add 1 tbsp olive oil and cook the portabello mushrooms. Remove from pan and set aside.
  7. Add the other tbsp of olive oil, cook the garlic until fragrant, then add the rice. Coat evenly in oil and until rice is light golden color.
  8. Add the rice vinegar, mirin, lemon mix until rice has fully absorbed all liquid.
  9. Add the strained mushroom broth 1/2 cup at a time, waiting until rice absorbs liquid each time, until the rice is al dente, about 20-30 minutes.
  10. Season with thyme, oregano, dashi, basil, green onions. Stir the portabello and 1.5 tablespoons of butter in the rice.
  11. Serve with the crispy mushrooms on top (so they don’t get soggy) and top with fresh grated parmesan.

The Ill-Equipped Baker’s Guide to a Bûche de Noël

So the Holiday season has passed, but it’s not too late for a Yule Log (aka a Bûche de Noël)!! I’ve been meaning to put some content in my blog for a while so I thought it might be a great idea to put a recipe. I first heard about a Bûche de Noël from a cooking manga I used to read as a kid (yeah pretty lame, but at least manga got me started on baking. Kitchen Princess, anyone?). Now, I’ve made a few roll cakes/roulades before, but never anything this crazy. Typically I follow the Asian take on Swiss rolls, as they tend to be lighter and less sweet. As a general rule, I half the amount of sugar in any American recipe because they’re always super overloaded! Anyways, I frankensteined this recipe from a few different sources, since I couldn’t find the perfect one to use. Keep in mind this is my first time making a Yule Log, so I’m open to improving it down the line. The reason it’s titled as ill-equipped is because I don’t have a lot of baking tools…. check my notes later to see what I mean. I wanted to write my own take on the classic Yule Log recipe and figured it’d be a great first blog post. It may seem intimidating, but it’s not that difficult. Here it is!

26735607_10215604356690046_1870764481_o.jpg

Bûche de Noël


Ingredients

Cake
  • 4 eggs
  • 50g cake flour
  • 30g cocoa
  • 30g melted butter
  • 80g sugar
  • 1/4 tsp salt
Ganache
  • 100g milk chocolate
  • 100g dark chocolate
  • 1 cup heavy cream (240ml)
  • 1/4 tsp salt

Filling

  • 150 ml Heavy Cream
  • 1 tbsp Sugar (or to taste)
  • 1 tsp vanilla
  • Optional: powdered coffee.

Meringue Mushroom

  • 2 large egg whites (~60 g)
  • 1/4 cup granulated sugar

Some notes:

  • Everything should be at room temperature! A quick way to make eggs warm is submerging them in warm water.
  • Another quick way to make melted butter is by making a mini-double broiler by using one small bowl and one sauce dish. I filled the small bowl with boiling water and the sauce dish with butter in small cubes. They melt super fast (and then you don’t have to clean up your pot).
  • I actually don’t have a square baking pan, so I DIY-ed my own by origami-ing the parchment paper to create a new barrier in my 9″x13″ rectangular pan, and supporting it using aluminium foil. So technically I used a 9″x9″ pan.
  • Whipping the Ganache is optional. I wanted it to be lighter since I found it to be a bit heavy. I found that the whipped Ganache also gave better textures.
  • For the filling, I opted for a simple whipped cream filling since it’s not as guilt-inducing as the traditional buttercream. Feel free to replace with buttercream though. Keep in mind that the cake won’t last as long with whipped cream since it will start getting soggy after a day.
  • I also don’t have a piping bag or tips, hence why the mushrooms look so funky. I think they still look pretty decent!!
  • If you don’t have a cookie cutter, you can use a knife instead when forming the little stump. I used a little tea infuser as a guideline to cut a round circle.

The following steps are in order. Everything should work out time-wise if done properly.

Cake

  1. Preheat oven to 350F (175C). Lightly grease an 11″ (28cm) square baking pan with butter, then line with parchment paper.
  2. Divide eggs into whites and yolks. Put the yolks in your electric mixer bowl. Save the whites for later.
  3. Sift cake flour and cocoa together in a small bowl. Set aside.
  4. Beat yolks and 1/3 of sugar until it’s thick and light. It should be creamy.
  5. In a different bowl, beat your egg whites. Slowly add the rest of the sugar in 3 parts as you are beating the eggs. Whip until stiff peaks. This is your meringue base.
  6. In the bowl of beaten yolks, add 1/3 of the meringue, and fold in carefully using a spatula without deflating the foam. Add this mixture back to the rest of the meringue, and carefully fold in the same way.
  7. Sift the cocoa-flour mixture and salt into the egg mixture, and carefully fold. Finally add melted butter and fold again.
  8. Pour the batter into the prepared baking pan and spread it evenly with a spatula. Drop it on the counter a few times to release air bubbles and bake for 10-12 minutes.
  9. Take out from the oven when the batter is no longer sticky, but the cake is still kinda moist. It’ll continue to cook when you take it out. Do not over bake it or rolling will be difficult!
  10. Lay out a new parchment paper dusted with cocoa powder. While your cake is still warm, take it out of your pan and peel the old parchment paper. Lay it down on the new dusted parchment paper.
  11. Making sure to not make any cracks, roll the cake with the parchment paper while it’s warm. This makes it easier to roll later and helps prevent cracking. Set aside to cool.

Ganache

  1. Put 1 cup of your heavy cream into the microwave and stir every so often until it starts to bubble. It took 3 minutes in my microwave on high, and I stirred every 1 minute.
  2. While waiting on your heavy cream, chop up both your milk and dark chocolates until they are very fine. (Seriously, the finer the better). Place them in a bowl
  3. Pour the hot heavy cream into your chocolate and let it sit for 10 minutes. Make the filling while you’re waiting on it.
  4. After ten minutes, pop it in the fridge while you make the meringue mushrooms. This just helps it thicken faster.
  5. When your mushrooms are in the oven, add salt and whip up your ganache using an electric mixer for a few seconds. It shouldn’t be beaten until it becomes whipped cream, but it should be creamy enough to hold some shape.

Filling

  1. Combine sugar and cream and vanilla in a bowl and beat with an electric mixer until stiff.
  2. Add some of the whipped ganache to the filling.
  3. Set aside two scoops of filling and add additional ganache to it for a darker color. This will serve as the color of the cross-sections.

You should have three different colors of cream. Light for the filling, Medium for the cross-sections and a Dark ganache for the bark. Store both the filling and ganache in the fridge while you make the mushrooms.

Meringue Mushroom

  1. Set your oven to 200F. Line a pan with parchment paper.
  2. Beat egg whites in electric mixer. When it starts to foam add the sugar and mix until medium peaks. (The eggs should be able to ribbon, but hold up some shape).
  3. Put the egg whites in a ziplock bag. Snip off the tip. Don’t make it too small that the meringue can hardly come out, but don’t make it too big that you can’t control it. Should be slightly bigger than how toothpaste comes out.
  4. On the parchment paper, pipe out several half-domes which will be your mushroom head. You might want to practice first. You can use your fingers to help smooth the surface.
  5. For the mushroom stalks, pipe out a smaller circle and pipe the meringue upwards to form small unicorn horns. Make more stalks than heads as the stalks can be more brittle when you’re assembling.
  6. Bake in oven for 1 hour and take it out when the edges are a bit brown. While waiting we will finish the ganache and start the assembly.

    Snapchat-1604587296.jpg
    Before baking. Could be worse right?

Assembly

  1. Unroll your cake carefully, and spread the light-colored filling on top using a spatula. (Optional: You can cut at a 45 degree angle on the side of the cake that will be outside to help it fold. You can also make small scores in the cake about 1″ apart from each other to help it roll better. I suck at it and end up cutting all the way through so I usually skip this step.)
  2. Carefully, avoiding cracks, roll up your cake again. Make sure to have some filling on the end to help the roll stick. Lay it on the folded end.

    20180109_184711.jpg
    A bit overstuffed but hey, no cracks!!
  3. Put the cake in the fridge for 30 minutes. Meanwhile you can start cleaning up!
  4. After the cake is set, use a circular cookie cutter to cut out one side of the roll, fill it up with filling, and then put the cut-out cake on top. This forms a little stump on your log.
  5. Using a decorating spatula, spread the medium-colored fillings on the cross sections: the stump, and the two ends.
  6. Spread the whipped ganache on the cake’s “bark”. Add texture using a fork, making curvy lines on the bark and circles on the cross-sections. log
  7. Dust your log with some powdered sugar for snow.
  8. By now your mushroom meringue should be done in the oven. Peel them off of the parchment paper.
  9. Using either ganache or nutella, cover the bottom side of the heads with a knife. Using the tip of your knife, make a little hole on the bottom of the head and fill it with some ganache or nutella. Stick a stalk on the head.Capture
  10. Dust some cocoa powder on top of your mushrooms to look like dirt. There are some variations to this, such as covering the heads with chocolate, smudging cocoa powder with your fingers; get creative!
  11. Place the mushrooms on your log and around it. Garnish with some chopped almonds, and maybe some leafy branches and pine cones stolen from your backyard!!

Enjoy! 🙂